
 |
 |
 |
 |
 |
 |
|
DOWNDOG | EAGLE | COBRA | HERO | HALF MOON | CORPSE | GATE
TRIANGLE | PEACOCK | LOCUST | COBBLER | SHOULDER STAND HEADSTAND | BRIDGE | CAMEL | COW FACE | UP BOW | INVERTED STAFF SEATED WIDE ANGLE | HEAD TO KNEE | TORTOISE | DANCER NOOSE  |
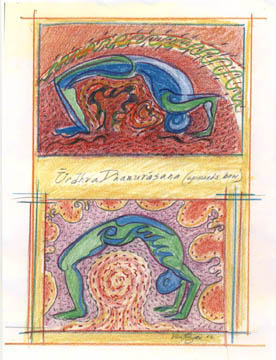
| Urdhva Dhanurasana ~ Upward Facing Bow Images by Nancy Van Kanegan Once you've warmed up, lie back, bend the knees and draw the feet toward the hips so the ankles are under the knees. Make sure the feet are parallel, with the heels and knees about hips width apart. Take your arms up overhead, bend the elbows, and place the hands palms down (fingers pointing toward your hips) at the top of the shoulders. If you're just starting out, you'll find it easier to have the hands somewhat wider than shoulder width apart. Just make sure the index fingers are parallel. Tilt the pelvis forward a bit so you have a natural arch in your lower back and so the groins drop down and in. Then, scoop your tail bone forward and up toward the pubic bone without losing the arch. With an inhale, press into the front of the heels (about two inches from the back), push the top of the shins forward toward the wall in front of you, and let the hips rise up a bit. Pull your arm pits back and in toward the ribs. Still pressing into the front of the heels, push into you hands and lift with an inhale to the top of your head. Pause. If it was a struggle to get this far, stay on the top of the head and press into the hands and feet for several breaths, or lift up as much as you can. To come down, tuck the chin, lower yourself onto the back of the shoulders, then lower the hips. Take several resting breaths, then repeat - or not, if that was enough. If getting to the top of the head was easy, you can try lifting into the full pose. Before you do, check to see that the arm pits are still pulling back and in. Then with an inhale, press into the hands and extend the arms to lift up into the bow. Instead of simply pushing up, however, try to lengthen up so you don't crunch and strain the lower back. To help the spine stay long, keep the top of the shins and tail bone moving forward while taking the sternum toward the chin and the wall behind you. Breathe deeply and smoothly, drawing energy into the center of your pelvis as you inhale, and extending out through the spine, legs, arms, toes and fingers as you exhale. As you hold the pose, keep pulling the armpits back and working the shoulder blades together so they stay on the back. Slide the sides of the throat and upper palate back to keep the hyoid bone (the floating bone in front of the throat) in. This helps maintain good alignment and facilitates the flow of organic energy that makes it easier to hold the pose. Keep the elbows and shins squeezing toward each other, and keep lifting the thighs, sacrum and back of the body up as you lengthen the sides of the torso. If you can, straighten the arms fully and bring the pelvis and ribs to the same level. Hold for three to five breaths, then lower down, rest and breathe. If that felt good, do the pose two or three more times, perhaps lifting up directly into the bow in one move without coming to your head first, or staying up for an extra breath each time. If you get to the top of your head all right but can't seem to get much higher, try using blocks. With one end of your mat against a wall, place a firm yoga block lengthwise against the wall with the outer edges of the blocks on the outer edge of the mat. You might even want to tilt each block on a diagonal so the back edge goes up the wall a bit. This will make it easier to place your palms on the wider face of the block instead of the edge and will lessen the degree to which you have to flex the wrists back, making the pose easier if your wrists are stiff. Place the hands on the blocks and lift up as before. The extra height of the blocks makes it easier to get more fully into the pose. When you do urdhva dhanurasana, take care to keep your knees from splaying out. If they do, you'll put more pressure on the lower back and lose the power of the legs. To prevent this, keep the tail bone stretching actively forward, the thighs working toward each other, and the groins working down to maintain inner spiral. You might also find it helpful to practice by placing a block between the.thighs just above the knees and squeezing it as you perform the pose. Using a block will also help to strengthen the inner thighs. Also, if lifting up with an inhale doesn't feel quite right, try doing so with an exhale. Donna Farhi, whose writings on the breath and on backbends are some of the most thorough I've seen, teaches this approach. Lifting on the exhale goes with the natural tendency of the inner body to expand and extend energy through the limbs on the exhale. (Think, for example, of how you tend to inhale and crouch down then exhale and spring up when you want to jump up for something.) Extending and lifting on the exhale helps you keep the spine long as you go into a backbend, especially one as strong as urdhva dhanurasana. After doing this intense backbend, you will probably want to do a counter stretch to release tension in the back and hips. One way is to bend the knees, lift the feet off the floor, and let the knees open about shoulder width apart. Take your arms around the back of your thighs and grasp one hand with the other or hook the fingers of one hand into those of the other. Pull the thighs down toward the ribs and hold for several breaths. Then release the hands, bring the knees together, and interlace the fingers over the shins. Gently squeezing the knees, draw the thighs toward the ribs, hold a few breaths, then release the feet back down. You might also want to do a gentle twist to further release the back. If so, take the arms out to the sides and with the feet on the floor, drop the knees first one way, then the other, as you look in the opposite direction. Tuck the knees up one more time, then lie back and enjoy the vibrant energy of the bow dancing within you. (For an excellent treatment of urdhva dhanurasana and other backbends, see Donna Farhi's book, Yoga Mind, Body & Spirit: A Return to Wholeness. Henry Holt and Company, 2000.) Text by Tim
Noworyta |
||
|
E-mail: info@yogamind.com | Return Home :: mindfully designed by braddon.com :: |
 Because
urdhva dhanurasana is so strenuous, it is not recommended for people with
heart problems, high blood pressure, detached retina or glaucoma, or severe
headaches. Also, those with spinal, shoulder or wrist problems should
avoid this pose. And because up-bow requires considerable openness in
the shoulders, front of the thighs, and hips - as well as lots of flexibility
in the spine - it's best to warm up first with asanas that gently stretch
and open these areas. Sun salutations, shoulder openers and less intense
backbends such as bhujangasana (cobra), setu banda sarvangasana (bridge),
ustrasana (camel) or dhanurasana (bow) are good ways to get ready for
this strong backbend.
Because
urdhva dhanurasana is so strenuous, it is not recommended for people with
heart problems, high blood pressure, detached retina or glaucoma, or severe
headaches. Also, those with spinal, shoulder or wrist problems should
avoid this pose. And because up-bow requires considerable openness in
the shoulders, front of the thighs, and hips - as well as lots of flexibility
in the spine - it's best to warm up first with asanas that gently stretch
and open these areas. Sun salutations, shoulder openers and less intense
backbends such as bhujangasana (cobra), setu banda sarvangasana (bridge),
ustrasana (camel) or dhanurasana (bow) are good ways to get ready for
this strong backbend.