
 |
 |
 |
 |
 |
 |
|
DOWNDOG | EAGLE | COBRA | HERO | HALF MOON | CORPSE | GATE
TRIANGLE | PEACOCK | LOCUST | COBBLER | SHOULDER STAND HEADSTAND | BRIDGE | CAMEL | COW FACE | UP BOW | INVERTED STAFF SEATED WIDE ANGLE | HEAD TO KNEE | TORTOISE | DANCER NOOSE  |
| Gomukhasana ~ Cow Face Pose You can see one of them from the front, especially in the version where the feet are close together and the hands are placed in front on the top knee rather than clasped behind. The pose then has a triangular form, broad at the top and narrow at the bottom, like the face of a cow. The crossed knees might even look like the lips of the cow's mouth. A classical Indian instrument, the gomukh, shares a similar triangular shape and name. You can see the other cow face by looking down at your legs when you sit in the version where the feet are out to the side, in what is sometimes called samkatasana or tight pose. Then the knees look like the top of the cow's head with your legs and feet as its horns or ears. Whatever its relationship to the face of a cow, this pose is one of the best stretches you can find for the outer thighs, hips and buttocks. And because it's one of the few that stretches the piriformis muscle of the outer hip, which lies on the sciatic nerve, it's very effective at alleviating sciatica caused by having a tight piriformis press the nerve. Gomukhasana also relaxes the abdominal muscles, tones the lower pelvis, and alleviates hemorrhoids and constipation. And when the hands are clasped behind the back and the elbows are raised alternately, the pose expands the chest, frees and stretches the shoulders, and makes breathing easier. So make this "face" with your body, and you'll feel open and relaxed, like a sacred cow enjoying siesta. Images by Nancy Van Kanegan
Since gomukhasana has several versions requiring different degrees of openness in the hips, knees and shoulders let's start with the "easy" one where you sit between the feet. To get into this position, start on all fours, lift your left knee, and bring it behind the right. Slide the left foot out a little to the right as you slide the right foot out slightly to the left. Sit between the feet, with the right knee on top of the left and the heels in as close as comfortable to the hips. If necessary use a block or folded blanket to elevate the hips so both sitting bones are grounded and there is no strain in the knees or hips. If you prefer, you can get into the pose by first bending the left knee back, then bringing the right leg around and bending it back so the right knee is over the left. Once you're seated between the feet, you can simply rest your hands on your knees with the right hand on top of the left, sit tall, and let the sitting bones be heavy. Lift the shoulders up and back, drop your chin to your chest and breathe in the pose for five to eight breaths. With the arms in this position, the pose is called gomukhasana A in the Ashtanga second series. Alternatively, you can lift the right arm up, bend the elbow, and walk the fingers down the middle of your back, as if you had an itch you wanted to get to but couldn't quite reach. If you're stiff, you can push the right elbow back gently with your left hand to help stretch the triceps and armpits, so your right hand goes further down the back. Next, extend your left arm out, turn it strongly inward to pronate it, and reach down and back as you bend the elbow and bring the back of the hand up the middle of your back - ideally to where you'll be able clasp the right hand or wrist. Then sit tall, look straight ahead, and gently stretch the elbows away from each other by pulling on the clasped hands. This is version B of the pose in the Ashtanga series. (Note that in the Iyengar system, the left elbow would usually be lifted if the right knee were on top.) If you can't hook the fingers or clasp the hands, have a strap or towel over your right shoulder. Then you can hold it and pull on it to stretch the elbows away from each other. Also, you might find it easier to clasp the hands behind the back if you first pronate your left arm and bring the back of the hand up the middle of the back. Then reach back around with your right hand to grab the left elbow and gently pull it toward the center of the back as you stretch the hand further up. Try to keep the shoulders square, the top of your arm bones back, your shoulder blades on the back, and the upper arms rotating externally. Also, keep lifting the heart and expanding internally as you breathe mindfully in the pose. Whatever you do, be careful with these arm movements, especially if you have rotator cuff tendonitis, bursitis, or other shoulder problems. But if the arm stuff is easy and you want more stretch, pull the stomach in and bend forward, chin toward the knees or beyond them, keeping the hands clasped and elbows pulling apart. This position helps to open the nasal passages and alleviate headaches, but for most of us, it's quite intense. If you want more stretch in the hips and thighs, start as before, but sit with the left heel between the buttocks. Bring the right foot as close to the left thigh as possible. Then do either version of the arms. For still more stretch, do the full out final version with the legs. Start by bringing the left heel under the right buttock, toes pointing straight back. Then bring the right knee over the left and draw the right foot close to the left, so the right heel is under the left buttock and the toes as straight back as possible. Sit on the heels (or try to - when I attempt this, the stiffness in my knees and thighs keeps me from sitting fully down). Again, do the arm thing. After you're done with the pose on one side, do the other, with the hands or elbows in the opposite position. Because cow face pose stretches a lot of areas in a way you may not be used to, you may want to do a downward dog after each side to even things out. Alternatively, come to all fours and stretch one leg back at a time, first flexing the foot, then twirling it in and out a few times. Then just sit for moment and let your mind and body - as well as your face - become as open and easy as the face of a happy cow. Text by Tim
Noworyta |
||
|
E-mail: info@yogamind.com | Return Home :: mindfully designed by braddon.com :: |
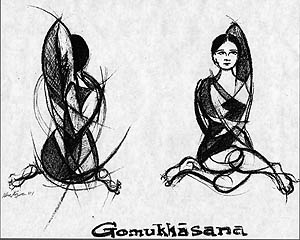 When
you first look at this pose, you might wonder, as I did, what its name
has to do with crossed knees, a lifted elbow and hands clasped behind
the back. But if you use a little imagination, you might find not just
one, but two cow faces in it.
When
you first look at this pose, you might wonder, as I did, what its name
has to do with crossed knees, a lifted elbow and hands clasped behind
the back. But if you use a little imagination, you might find not just
one, but two cow faces in it.