
 |
 |
 |
 |
 |
 |
|
DOWNDOG | EAGLE | COBRA | HERO | HALF MOON | CORPSE | GATE
TRIANGLE | PEACOCK | LOCUST | COBBLER | SHOULDER STAND HEADSTAND | BRIDGE | CAMEL | COW FACE | UP BOW | INVERTED STAFF SEATED WIDE ANGLE | HEAD TO KNEE | TORTOISE | DANCER NOOSE  |
| Kurmasana ~ Tortoise Pose Images by Nancy Van Kanegan Because kurmasana gives the back, especially in the lumbar area, such a strong stretch, you may want to take a pass on it if you have disc problems or find less intense forward bends, such as paschimottasana, difficult. But if your back is healthy, this pose can help keep it that way, increase flexibility, and produce all the benefits mentioned above. Start by sitting on the floor with your legs a couple of feet apart and your knees slightly bent. Take your hands down between the legs and slide them out under your calves. As you do this, work the arms under the back of the knees. If you're new to this pose, you might want to start with half tortoise, in which you reach forward to grab the soles of the feet from the outside. Roll the thighs in to get the knees pointing straight up. Then gently push your feet forward as you pull on them to elongate the spine and stretch forward. As you stretch, be sure to keep pushing the groins down and lifting the lower abs in and up to prevent straining your lower back. Also, gaze several feet ahead and elongate your neck as you rotate in the hips to deepen the forward bend. Go out, not just down, as if you were taking your sternum (breastbone) across the room. Hold for eight to ten calm and deep breaths, then slowly come up out of the pose. If this seemed ok for your back, you might want to go into the full pose by pushing the arms out to the side under your knees, then back at an angle (this helps prevent strain on the elbows and shoulders) with your palms down as you bend forward and work the back of the knees up the arms toward your shoulders. Be careful not to have the backs of the knees over the elbows, because the pressure of your legs there can hurt them. Start to push forward through your heels to extend the legs. Keep extending the spine and performing the other actions describe above. But instead of pulling on your feet, push the arms back against your thighs to help elongate the spine. You might also want to pulsate in the pose as Dona Holleman's suggests: Elongate the spine from the groins while you inhale and activate mula bandha. Then elongate the legs to bring the spine further down as you exhale, eventually getting your forehead, then your chin and finally your chest to the floor. Remember to roll the inner thighs down and try to loop the shoulders back (they'll come forward, but looping will help stretch the spine and prevent over stretching the shoulders or crunching the collar bones). Also, keep the arm muscles toned and pulling in towards the shoulders to prevent straining the elbows. Instead of pushing into the pose, stretch gently and mindfully into it. After all, there's really no place to go except where you are. After eight to ten breaths, come out slowly. If you want an even stronger stretch, you can try the more intense version of the pose known as supta kurmasana or sleeping turtle. Start as before, but after extending the arms out to the side, turn the palms up and push the arms back so they are along your hips. (To do this, I find it's helpful to bend the knees a bit and rock from side to side as you wriggle the arms back.) Work the shoulders further under the knees and the feet toward each other as you bend the elbows and (ideally) clasp the hands over your lower back. If that doesn't happen , hold onto a strap or towel and try to work the hands closer to each other behind the back. Then cross one ankle over the other and lower your forehead to the floor between your shins * or perhaps just to your ankles, if the full pose is not possible or too intense. As those of you who take Ashtanga classes know, it can be very helpful to have a teacher or partner assist you in clasping the hands and crossing the feet in this pose.
After you come out of any version of kurmasana, you might want to sit cross-legged and gently arch and flex the spine a few times and twist gently to each side to relieve any tension there. Then take a moment to notice how calm, centered and at ease you feel, like a turtle on a log sunning happily in a quiet pond.
Text by Tim
Noworyta |
||
|
E-mail: info@yogamind.com | Return Home :: mindfully designed by braddon.com :: |
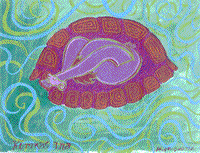 Now
here's a real forward bend, one that will make you respect what being
a turtle is all about. Kurmasana strongly stretches the spine, back
muscles and inner thighs, opens the hips, stimulates the abdominal organs,
and calms the nervous system, so the mind becomes clear and free of emotion.
In fact, Light on Yoga says a tortoise drawing itself into its
shell is used in the Bhagavad Gita to represent pratyahara, the withdrawing
from external sensations. And the pose is named for the Tortoise Incarnation
of Vishnu in which he dives to the bottom of the ocean (think of your
inner depths) to find the lost nectar of the gods. So kurmasana helps
to prepare one for meditation. Because the legs pull down on the arms
in this pose, the spine is stretched more strongly than in other forward
bends, creating more space between the vertebrae, increasing circulation
and improving metabolism in the vertebral discs. The result is a refreshing
release of tension that eliminates fatigue and boosts energy. So when
you do decide to come out of your shell, you'll be ready for anything.
Now
here's a real forward bend, one that will make you respect what being
a turtle is all about. Kurmasana strongly stretches the spine, back
muscles and inner thighs, opens the hips, stimulates the abdominal organs,
and calms the nervous system, so the mind becomes clear and free of emotion.
In fact, Light on Yoga says a tortoise drawing itself into its
shell is used in the Bhagavad Gita to represent pratyahara, the withdrawing
from external sensations. And the pose is named for the Tortoise Incarnation
of Vishnu in which he dives to the bottom of the ocean (think of your
inner depths) to find the lost nectar of the gods. So kurmasana helps
to prepare one for meditation. Because the legs pull down on the arms
in this pose, the spine is stretched more strongly than in other forward
bends, creating more space between the vertebrae, increasing circulation
and improving metabolism in the vertebral discs. The result is a refreshing
release of tension that eliminates fatigue and boosts energy. So when
you do decide to come out of your shell, you'll be ready for anything.